IO Controller
When workloads with different needs share resources on a system, the ability to control, limit, and prioritize IO operations for each workload is critical.
For example, we need to make sure the main workload isn't impacted if a background system app starts using excess IO, and that the system has the flexibility to limit IO to low priority workloads, while providing IO to high priority workloads.
The cgroup2 IO controller regulates the distribution of IO resources, allowing you to specify the number of IO operations per second (IOPS) that a cgroup can read or write. It also allows you to measure and monitor a cgroup's IO use and IO pressure.
cgroup2 IO controller enhancements
The cgroup2 IO controller introduces a number of benefits over version 1 that greatly improve the ability to manage IO on a system.
cgroup1 accounts for and controls only direct IOs, i.e., filesystem metadata IOs (both read and write), and buffered reads. This leaves other types of IOs, such as buffered IO (which is often the majority in many use cases), unaccounted for and uncontrollable.
cgroup2 allows comprehensive control and accounting of all IOs per-cgroup: buffered, filesystem metadata, swap, and direct IOs, making IO control a far more effective component of a resource utilization strategy.
Interface files
Like all cgroup controllers, the IO controller creates a corresponding set of interface files in its child cgroups when it's enabled. You adjust and limit IO by modifying these interface files. Other interface files allow you to query and monitor a cgroup's IO stats.
Here are the config files you'll typically use to manage IO resources. Be sure to see the canonical cgroup2 reference documentation for additional details.
| File | Definition |
|---|---|
io.latency | Quality of service mechanism to guarantee a cgroup's level of IO completion latency. Specifies the number of milliseconds a process can wait before IO from other processes is given to it.If the average completion latency is longer than the target set here, other processes are throttled to provide more IO, effectively prioritizing the job with the lowest io.latency setting. io.latency is the currently preferred mechanism for IO control: See the discussion of io.latency below for more information. |
io.pressure | Gives the percentage of wall time in which some or all tasks are waiting for a block device, or IO. See the PSI resource pressure metrics page for more details. |
io.stat | IO usage statistics. Lines are keyed by $MAJ:$MIN device numbers and not ordered. The following keys are defined:
8:16 rbytes=1459200 wbytes=314773504 rios=192 wios=353 dbytes=9973760 dios=79 8:0 rbytes=90430464 wbytes=299008000 rios=8950 wios=1252 dbytes=69632 dios=158 |
io.max | This is where you specify IO limits. Lines are keyed by $MAJ:$MIN device numbers and not ordered.The following nested keys are defined.
max to remove a specific limit. If the same key is specified multiple times, the outcome is undefined.BPS and IOPS are measured in each IO direction, and IOs are delayed if the limit is reached. Temporary bursts are allowed.Setting read limit at 2M BPS and write at 120 IOPS for 8:16:echo "8:16 rbps=2097152 wiops=120" > io.maxReading returns the following:8:16 rbps=2097152 wbps=max riops=max wiops=120Write IOPS limit can be removed by writing the following:echo "8:16 wiops=max" > io.maxReading now returns the following:8:16 rbps=2097152 wbps=max riops=max wiops=max |
Protecting workloads with io.latency
You protect workloads with io.latency by specifying a latency target (e.g., 20ms). If the protected workload experiences average completion latency longer than its latency target value, the controller throttles any peers that have a more relaxed latency target than the protected workload.
The delta between the prioritized cgroup's target and the targets of other cgroups is used to determine how hard the other cgroups are throttled: If a cgroup with io.latency set to 20ms is prioritized, cgroups with latency targets <= 20ms will never be throttled, while a cgroup with 50ms will get throttled harder than a cgroup with a 30ms target.
Interface
The interface for io.latency is in a format similar to the other controllers:
MAJOR:MINOR target=<target time in microseconds>
When io.latency is enabled, you'll see additional stats in io.stat:
depth=<integer>—The current queue depth for the group.avg_lat=<time in microseconds>—The running average IO latency for this group. This provides a general idea of the overall latency you can expect for this workload on the specified disk.
Note: All cgroup knobs can be configured through
systemd. See the systemd.resource-control documentation for details.
Using io.latency
The limits are applied only at the peer level in the hierarchy. This means that in the diagram below, only groups A, B, and C will influence each other, and groups D and F will influence each other. Group G will influence nobody.
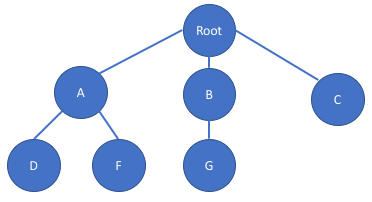
Thus, a common way to configure this is to set io.latency in groups A, B, and C.
Configuration strategies
Generally you don't want to set a value lower than the latency your device supports. Experiment to find the value that works best for your workload: Start at higher than the expected latency for your device, and watch the avg_lat value in io.stat for your workload group to get an idea of the latency during normal operation. Use this value as a basis for your real setting: Try setting it, for example, around 20% higher than the value in io.stat. Experimentation is key here since avg_lat is a running average and subject to statistical anomalies.
Setting too tight of a control (i.e., too low of a latency target) provides greater protection to a workload, but it can come at the expense of overall system IO overhead if other workloads get throttled prematurely.
Another important factor is that hard disk IO latency can fluctuate greatly: If the latency target is too low, other workloads can get throttled due to normal latency fluctuations, again leading to sub-optimal IO control.
Thus, in most cases then, you'll want to set the latency target higher than expected latency to avoid unnecessary throttling—the only question is by how much. Two general approaches have proven most effective:
Setting
io.latencyhigher (20-25%) than the usual expected latency. TThis provides a tighter protection guarantee for the workload. However, the tighter control can sometimes mean the system pays more in terms of IO overhead, which leads to lower system-wide IO utilization. A setting like this can be effective for systems with SSDs.Setting
io.latencyto several times higher than the usual expected latency, especially for hard disks. A hard disk's usual uncontended completion latencies are between 7 and 20ms, but when contention occurs, the completion latency balloons quickly, easily reaching 10 times normal. Because the latency is so volatile, workloads running on hard disks are usually not sensitive to small swings in completion latency; things break down only in extreme conditions when latency jumps several times higher (which isn't difficult to trigger). Effective protection can be achieved in cases like this by setting a relaxed target on the protected group (e.g., 50 or 75ms), and a higher setting for lower priority groups (e.g., an additional 25ms over the higher priority group). This way, the workload can have reasonable protection without significantly compromising hard disk utilization by triggering throttling when it's not necessary.
How throttling works
io.latency is work conserving: as long as everybody's meeting their latency target, the controller doesn't do anything. Once a group starts missing its target it begins throttling any peer group that has a higher target than itself. This throttling takes two forms:
Queue depth throttling—This is the number of outstanding IO's a group is allowed to have. The controller will clamp down relatively quickly, starting at no limit and going all the way down to 1 IO at a time.
Artificial delay induction—There are certain types of IO that can't be throttled without possibly affecting higher priority groups adversely. This includes swapping and metadata IO. These types of IO are allowed to occur normally, but they are "charged" to the originating group.
Once the victimized group starts meeting its latency target again, it will start unthrottling any peer groups that were throttled previously. If the victimized group simply stops doing IO the global counter will unthrottle appropriately.
fbtax2 IO controller configuration
As discussed previously, the goal of the fbtax2 cgroup hierarchy was to protect workload.slice. In addition to the memory controller settings, the team found that IO protections were also necessary to make it all work.
When memory pressure increases, it often translates into IO pressure. Memory pressure leads to page evictions: the higher the memory pressure, the more page evictions and re-faults, and therefore more IOs. It isn’t hard to generate memory pressure high enough to saturate a disk with IOs, especially the rotating hard disks that were used on the machines in the fbtax2 project.
To correct for this, the team used a strategy similar to strategy 2 described above: they prioritized workload.slice by setting its io.latency to higher than expected, to 50ms. This provides more protection for workload.slice than for system.slice, whose io.latency is set to 75ms.
When workload.slice has been delayed by lack of IO past its 50ms threshold, it gets IO priority: the kernel limits IO from system.slice and reallocates it to workload.slice so the main workload can keep running.
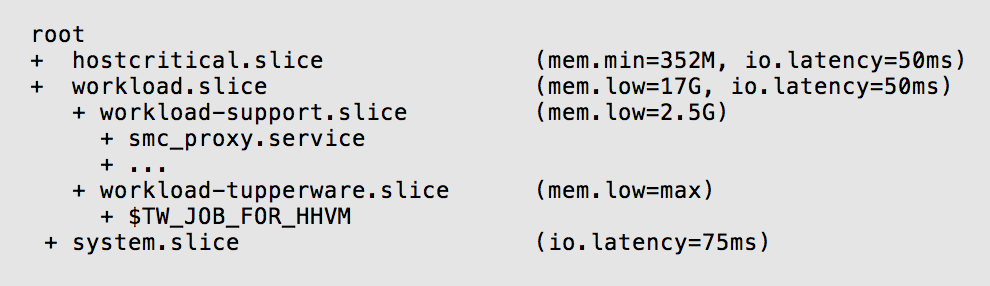
hostcritical.slice was given a similar level of protection as workload.slice since any problems there can also impact the main workload. In this case it used memory.min to guarantee it will have enough to keep running.
Though they knew system.slice needed lower IO priority, the team determined the 75ms number through trial and error, modifying it repeatedly until they achieved the right balance between protecting the main workload and ensuring the stability of system.slice.
In the final installment of this case study, we'll summarize the strategies used in the fbtax2 project, and look at some of the utilization gains that resulted in Facebook's server farms.